
Every project runs on time. Tasks need a start point, an end point, and a clear sequence in between. Without that structure, teams lose track of priorities, deadlines slip, and stakeholders lose visibility into progress.
A project timeline solves this problem. It turns a list of tasks into a visual, time-bound plan that shows what happens, when it happens, and who is responsible for it.
This article covers what a project timeline is, why it matters, the different types you can use, the elements every timeline needs, and a step-by-step process for building one. You will also find timeline examples, a free template, and answers to common questions project managers ask.
- 1.A project timeline is a visual representation of a project’s tasks, deadlines, and milestones arranged in chronological order.
- 2.It improves clarity, keeps teams aligned on goals, and reduces the risk of missed deadlines.
- 3.Common timeline formats include Gantt charts, Kanban timelines, PERT charts, and milestone charts.
- 4.Every effective timeline includes tasks, owners, dependencies, deadlines, and milestones at minimum.
- 5.Building one starts with defining scope and ends with ongoing monitoring and updates.
- 6.Tools like ProofHub, Asana, and Monday.com simplify timeline creation and tracking.
What is the project timeline?
A project timeline is a visual representation of all the tasks in a project. It is called a timeline because the tasks are represented as a sequence of things to be done at different points in time. It shows start dates, end dates, dependencies, and project milestones (which are only points in time, not tasks themselves).
It gives all the stakeholders of a project a single source of truth about what needs to be done, and when. By using a project timeline, teams can turn a disconnected list of tasks into a cohesive action plan.
Why is it important to create a project timeline?
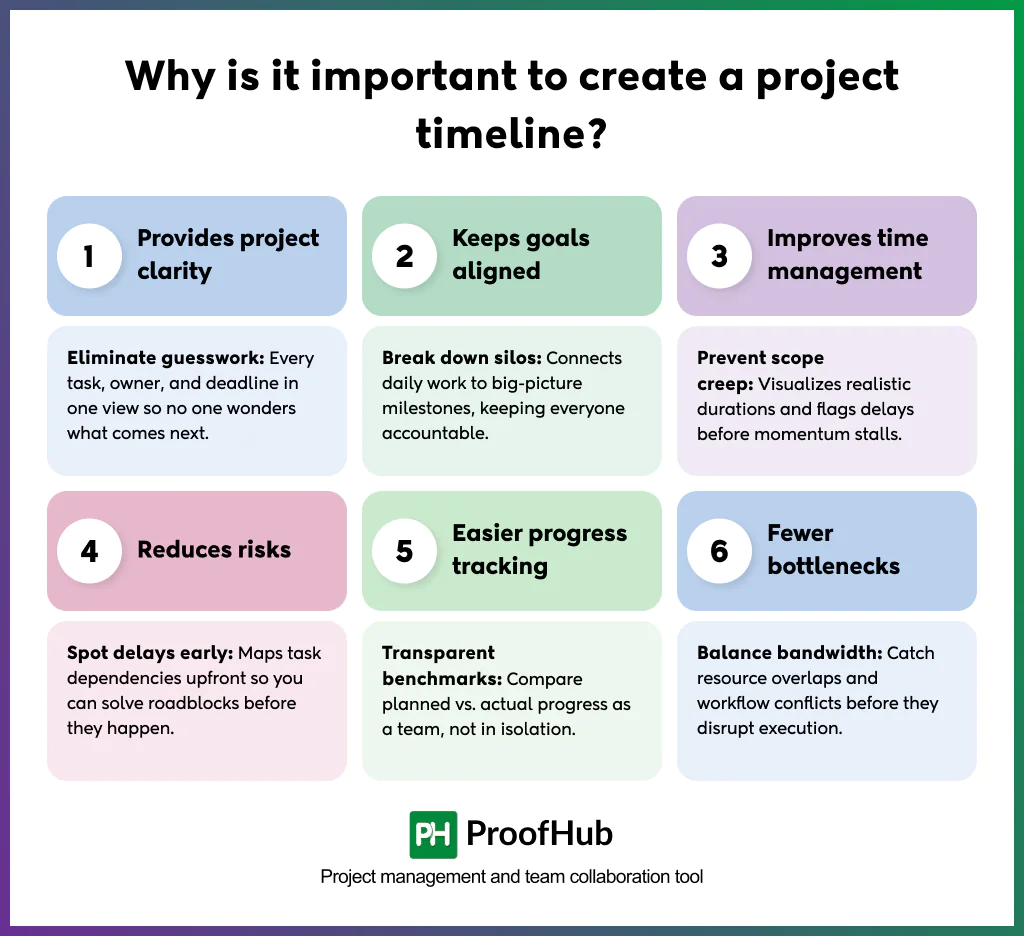
A project timeline is important because it provides project clarity, keeps goals aligned, improves time management, reduces risks, enables easier progress tracking, and leads to fewer bottlenecks in the long run.
A project timeline is not just a scheduling tool. It shapes how a team executes work from start to finish. Additionally, the timeline defines the entire workflow strategy.
Here is why it matters, explained in detail:
- Provides project clarity: A timeline lays out every task and deadline in one place, so nobody has to guess what comes next or who owns what. As a result, teams spend less time arguing and more time being productive and useful.
- Keeps goals aligned: When every task ties back to a milestone, the whole team stays focused on the same end result instead of working in silos. The timeline is visible to everyone, so accountability becomes much easier to implement.
- Improves time management: Helps teams allocate time realistically, avoid overcommitting, and prevent scope creep. If a task is overdue, it becomes visible immediately, and team members can set aside other tasks to complete the pending task first.
- Reduces risks: Mapping dependencies ahead of time exposes potential delays before they happen, giving teams room to plan around them. It brings the variables under control.
- Easier progress tracking: Allows you to compare the planned schedule against actual progress at any point in the project. It makes it easier for the team to keep an eye on the task and address any discrepancies.
- Fewer bottlenecks: Teams can spot overlaps and conflicts early instead of discovering them mid-project. Seeing all the tasks in order helps identify where the maximum bandwidth is needed, and the team can plan accordingly.
What are the types of project timelines?
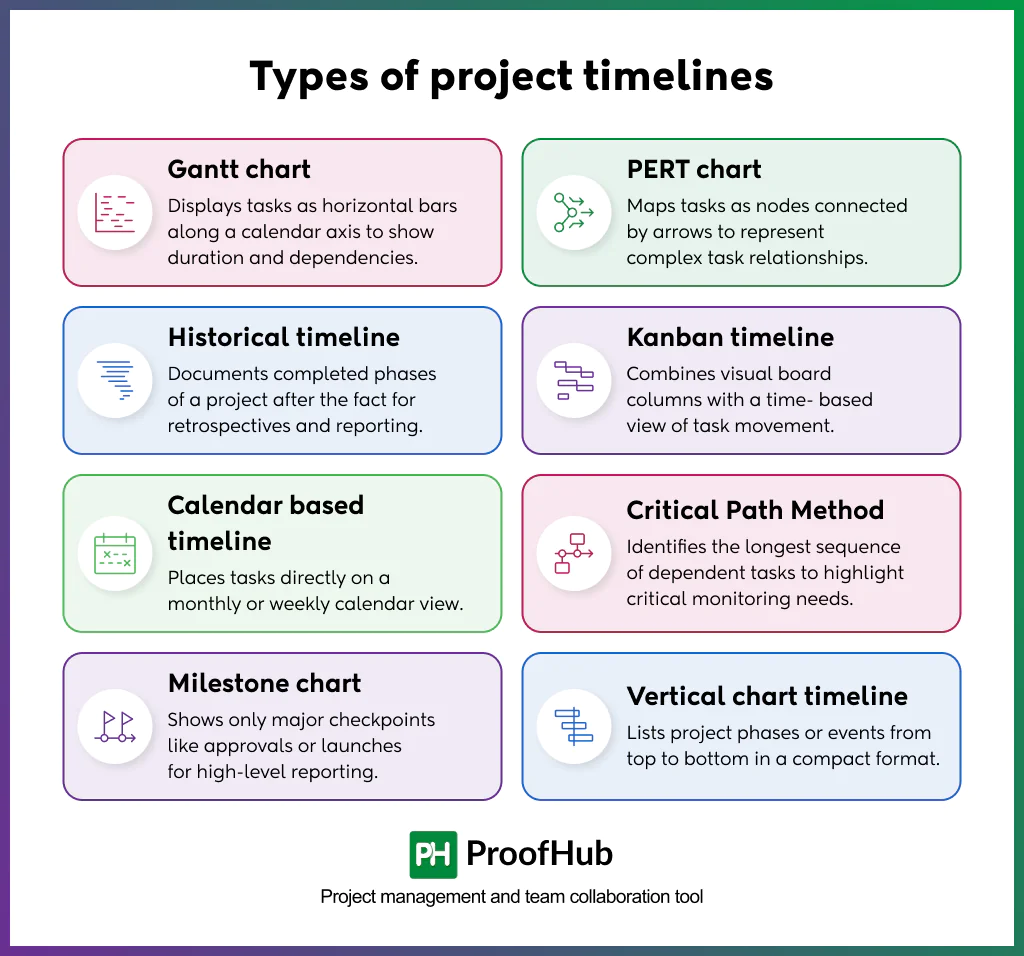
The different types of project timeline views include Gantt charts, PERT charts, historical timeline, Kanban timeline, calendar-based timeline, critical path method, milestone chart, and vertical chart timeline.
Different projects call for different timeline formats. The right choice depends on project complexity, team size, and how much detail stakeholders need to see.
Below, the different types of timelines are explained:
1. Gantt chart
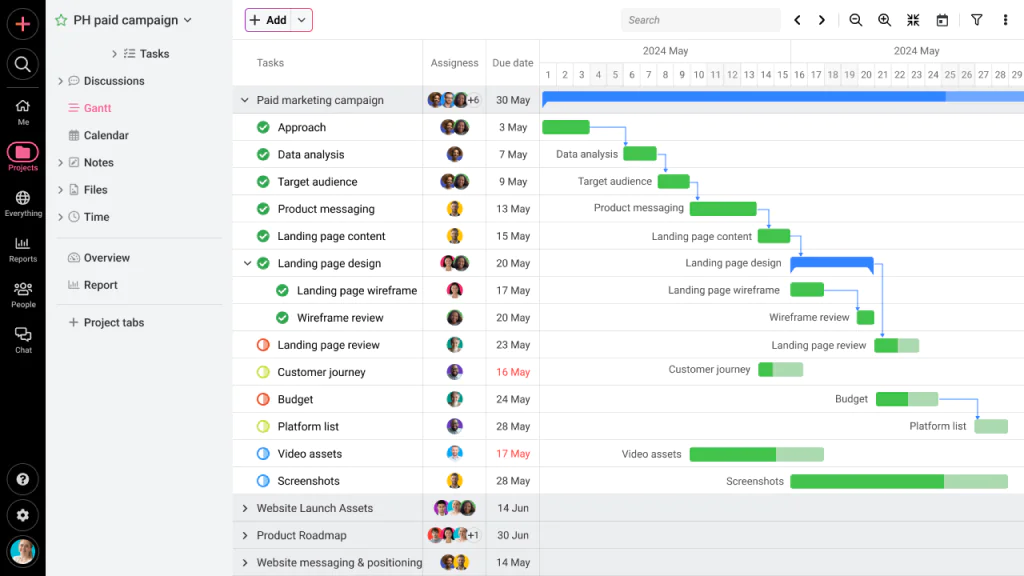
Gantt chart displays tasks as horizontal bars along a calendar axis. Each bar represents a task’s duration, start date, and end date, and bars often connect to show dependencies.
One of the most useful features of a Gantt chart is that once you adjust a task, the rest of the tasks are automatically updated to reflect the new deadline.
Gantt charts are a widely used timeline format because they make task sequencing and overlap easy to read at a glance.
2. PERT chart
PERT (Program Evaluation and Review Technique) chart maps tasks as nodes connected by arrows that represent dependencies.
It is built for projects with complex task relationships and is often used alongside the Critical Path Method to estimate the shortest possible project duration.
3. Historical timeline
Historical timeline documents completed phases of a project after the fact. Meaning, project managers make this timeline after the project has already been completed.
They need to map out and review how the project progressed, in what order the team completed the tasks, and any other patterns that might emerge.
It is useful for retrospectives, reporting, and case studies, since it shows what actually happened rather than what was planned.
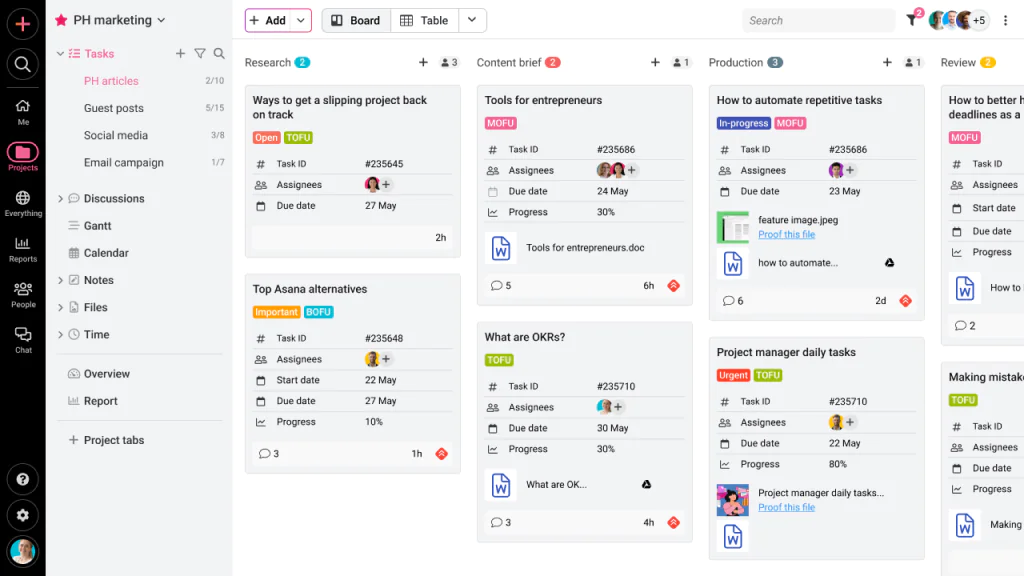
4. Kanban timeline
Kanban timeline combines the visual board structure of Kanban (columns like To Do, In Progress, Done) with a time based view of when tasks move between stages.
The timeline works well for teams running agile or continuous workflows. This is probably the most visually intuitive timeline representation out of all the options listed here.
Kanban was first implemented at Toyota, and later found recognition in the wider project management sphere.
5. Calendar based timeline
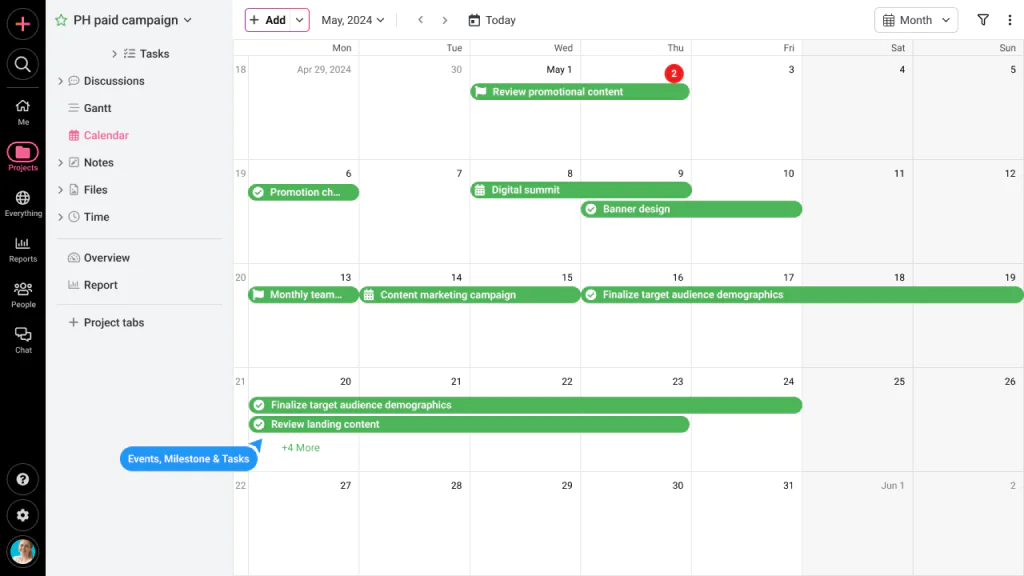
Calendar based timeline places tasks directly on a monthly or weekly calendar view. The biggest advantage of combining a calendar task view with the rest of a person’s schedule is that it brings out the full picture of their itinerary.
They can pick and choose which task to prioritize based on commitments and organizational goals.
It suits teams that think in terms of dates rather than task duration bars, and it integrates naturally with scheduling tools.
6. Critical Path Method (CPM)
CPM identifies the longest sequence of dependent tasks in a project, known as the critical path.
Any delay on this path delays the entire project, so CPM timelines highlight exactly which tasks need the closest monitoring.
The critical path method is essential in project management for calculating other metrics such as schedule performance index and cost performance index.
7. Milestone chart
Milestone charts strip away task-level detail and show only the major checkpoints in a project, such as approvals, launches, or deliverable handoffs.
It is often used in executive reporting where stakeholders want a high-level view, because the stakeholders often want to know where the task is at the moment rather than what particular tasks have been completed.
Giving more than necessary details can seem irrelevant to them.
8. Vertical chart timeline
A vertical chart timeline lists project phases or events from top to bottom instead of left to right. It is common in presentations and reports where a compact, linear format communicates progress more clearly than a wide horizontal chart.
Teams working on long-term projects don’t generally prefer this format because it makes it difficult to trace the provenance of tasks and their various dependencies.
What are the key elements of a project timeline?
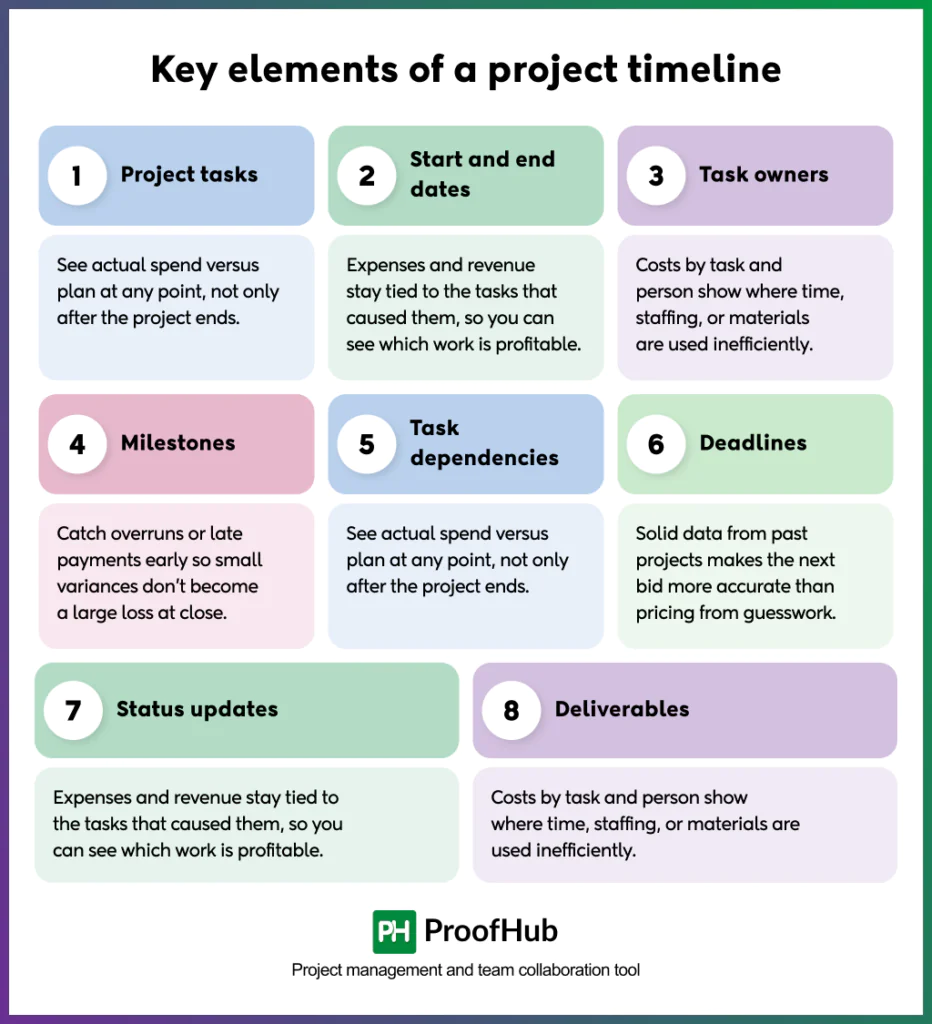
The key elements of a project timeline are project tasks, start and end dates, task owners, milestones, task dependencies, deadlines, status updates, and deliverables.
A project timeline is only useful if it includes the right building blocks. Together, these elements cover the entire lifetime of the project cycle. From planning and execution to review and reporting.
These elements are described below in fuller detail:
- Project tasks: Tasks are the specific to-do items that need to get done. Breaking a big goal into smaller steps helps you figure out the exact skills needed and prevents small, hidden chores from eating up your time.
- Start and end dates: Start and end dates show when a task is expected to begin and finish. Setting these dates gives team members a clear time frame for their work. They also help managers see whether tasks are taking longer than planned and whether the project is falling behind schedule.
- Task owners: A task owner is the person responsible for making sure a specific task is completed. Giving each task a clear owner prevents confusion about who should handle the work. It also gives the team someone to contact when questions, delays, or other problems come up.
- Milestones: Milestones are important points that mark major achievements in a project. Unlike regular tasks, they usually represent the completion of an important stage or goal. For example, completing the design phase or approving a final product can be treated as a milestone.
- Task dependencies: Task dependencies show how different tasks are connected to each other. Some tasks cannot begin until another task has been completed, such as testing a product after its development is finished. Tracking these connections helps the team plan the right order of work and avoid unnecessary delays.
- Deadlines: Deadlines are the dates by which specific work must be completed. They are especially important when a project has fixed commitments, such as a product launch, client delivery, or legal requirement. Missing an important deadline can delay other work and may also increase project costs.
- Status updates: Status updates show how much progress has been made on each task. They can indicate whether a task is not started, in progress, completed, or delayed. Regular updates help managers identify problems early and take action before they affect other parts of the project.
- Deliverables: Deliverables are the actual results or outputs produced during a project. They can include reports, designs, software, documents, products, or other completed work. Clearly defining each deliverable helps everyone understand what must be produced and what the finished work should look like.
How to create a project timeline?
The steps to create a project timeline include defining the project scope, making a work breakdown structure, listing tasks and subtasks, determining the time required for each task, adding task dependencies, managing resources, setting milestones, sharing the timeline with stakeholders, and monitoring and updating regularly.
Follow these steps to go from a blank plan to a fully functioning schedule:
1. Define the scope of your project
Start by clarifying what the project will and will not include. A clear scope statement prevents scope creep later and gives you the boundaries needed to estimate tasks and timeframes accurately.
2. Create a work breakdown structure
Break the project down into phases, then break each phase into smaller components. A work breakdown structure (WBS) organizes the project hierarchically, making it easier to assign tasks and estimate effort.
3. List tasks and subtasks
Turn each component of the WBS into specific, actionable tasks and subtasks. Each task should be small enough to assign to one owner and estimate with reasonable accuracy.
4. Determine the time required for each task
Estimate how long each task will realistically take. Use historical data from similar projects where available, and build in buffer time for tasks with higher uncertainty.
5. Add task dependencies
Identify which tasks rely on the completion of others. Mapping dependencies early prevents scheduling conflicts and reveals the critical path, the sequence of tasks that determines your minimum project duration.
6. Manage your resources effectively
Match tasks to the people, tools, and budget available. Check for overallocation, where the same person is assigned to multiple tasks at once, and adjust the schedule to keep workloads realistic.
7. Set milestones
Place milestones at points where major phases are complete or key decisions need approval. Milestones give the team and stakeholders clear markers to track progress against.
8. Share the timeline with stakeholders
Distribute the finished timeline to everyone involved, including team members, project sponsors, and clients. Make sure everyone understands their responsibilities and the dates they are accountable for.
9. Monitor and update regularly
A project timeline is a living document. Review it on a regular cadence, update task statuses, adjust dates when delays occur, and communicate changes as soon as they happen.
What are the best tools for creating project timelines?
The right software turns a static timeline into something teams can actively manage and update in real time. Here are five tools worth considering:
1. ProofHub combines a built-in Gantt chart with the rest of the project workflow, so timelines are not an isolated view but connected to everything happening around them. You can map out tasks, adjust start and end dates, and link dependent tasks.
2. Asana’s timeline view lays out tasks along a horizontal axis so teams can see overlaps and gaps in scheduling, while the Calendar view gives a more familiar day-by-day layout for teams and dependency tracking works across projects, not just within a single project.
3. Monday.com takes a highly visual approach, built around color-coded boards that can be customized down to the column and status level. Teams can set up their own timeline boards and processes, rather than being forced into a fixed template.
4. Microsoft Project’s Gantt chart supports detailed critical path calculations, resource leveling, and cost tracking, giving project managers the tools to model how changes to one task ripple through an entire multi-month or multi-year plan.
5. TeamGantt strips project planning down to the timeline itself. Its drag-and-drop interface lets users build out a schedule without needing to learn a full project management system first, which makes it approachable for teams or individuals just starting to formalize how they plan to work.
Example of Project timeline
Project timelines can take several shapes and forms, including examples such as website redesign, product launch, and event planning. These examples use the project timeline in different ways:
- Website redesign project: A timeline covering discovery and research (weeks 1 to 2), wireframing and design (weeks 3 to 5), development (weeks 6 to 9), testing and QA (week 10), and launch (week 11), with milestones marking design approval and go-live.
- Product launch timeline: Phases spanning market research, product development, marketing campaign planning, beta testing, and the public launch date, with dependencies linking marketing activities to the development completion milestone.
- Event planning timeline: A timeline starting with venue booking and vendor selection, moving through invitations and logistics coordination, and ending with the event date itself, with milestones for final headcount confirmation and setup day.
Free project timeline template
A project timeline template gives you a ready-made structure, so you are not building a schedule from scratch every time. The template includes:
- A task list column with space for subtasks
- Start date and end date fields for each task
- A task owner or assignee field
- A dependency column linking related tasks
- A visual timeline or Gantt-style bar view
- A milestone row or marker system
- A status field for tracking progress
You can download the ready-to-use project timeline template below. Easily use it with Google Sheets or Microsoft Excel.
Free project timeline template
A project timeline template gives you a ready-made structure, so you are not building a schedule from scratch every time.
Download the free template nowTo use the template, list your tasks first, then fill in dates and owners, map out dependencies, and mark your milestones. Update the status column as work progresses so the template stays an accurate reflection of where the project stands.
Most project management platforms, including ProofHub, offer built-in templates that follow this structure and sync directly with live task data.
What is the difference between a project timeline, plan and schedule?
A project plan is the full strategic document covering objectives, scope, budget, resources, and risk management. A project schedule is a detailed, often granular breakdown of task dates and durations.
A project timeline is the visual representation of that schedule, showing tasks and milestones along a chronological axis. In short, the plan defines what and why, the schedule defines when in detail, and the timeline shows it visually.
When is a project timeline created in the project lifecycle?
A project timeline is typically created during the planning phase, right after scope, objectives, and the work breakdown structure have been defined.
It comes before task execution begins, since the team needs the timeline to know what to work on and in what order.
Who is responsible for creating a project timeline?
The project manager usually builds the timeline, since they see the full scope of work and how tasks connect. But they should not build it alone.
Task owners need to weigh in on how long their work will actually take, or the timeline becomes a guess rather than a plan. Team leads can also flag resource conflicts before they cause delays.
Once the timeline is set, everyone assigned to it shares responsibility for keeping their part accurate.
How often should a project timeline be updated?
A timeline should be reviewed at least once a week for most projects. Fast-moving projects with tight deadlines may need daily check-ins.
Beyond routine updates, the timeline should also change immediately whenever something shifts it, like a missed deadline, a new dependency, or a change in scope. Waiting too long to update a timeline lets small delays pile up unnoticed until they threaten the final launch date.
Conclusion
A project timeline turns a scattered list of tasks into a plan everyone can follow. It gives every task a start date, an end date, an owner, and a place in the sequence, so the team always knows what comes next and who is doing it. Whether you use a Gantt chart, a Kanban timeline, or a simple calendar view, the format matters less than making sure the timeline includes the right pieces.
Tools like ProofHub make this easier by keeping the timeline connected to the rest of the project, so updates, discussions, and approvals all happen in one place instead of across scattered tools. With the right structure and the right tool, a project timeline stops being paperwork and becomes the thing that actually keeps a project on track.